
Hey all,
Not sure this is the right place for this...please move if not....
I'm having a devil of a time trying to get really clean and good photos out of my light tent. I have no idea if I'm using the right bulbs, if the room lights should ALL be off and I ONLY use the table lights, etc. If anyone here has some good insights and some pics of their photo set ups, I would be greatly appreciative! Thanks!
What's new in the Gallery?
Check This thread
Check This thread
Kit Photography
Moderators: tay666, Moderators
-
ignatz

- Site Admin
- Knight of the Round Bench
- Posts: 12738
- Joined: November 25th, 2003, 11:31 pm
- Location: Boston
- Contact:
Re: Kit Photography
It's best to use one source of light so you don't throw off the camera's White Balance. Maybe if you post some pix or describe what's going on in the picture some of the more photo-saavy members can help out.
Steven
CALM DOWN. It's only a hobby.
Oh, and MODEL ON!
CALM DOWN. It's only a hobby.
Oh, and MODEL ON!
-
JJCap1

- Bishop of Build Ups
- Posts: 3196
- Joined: December 20th, 2003, 3:29 pm
- Location: Carlisle, PA
- Contact:
Re: Kit Photography
Filmy takes some of the best photos you'll see posted. Here's the link to his tutorial on his site. Lots of technical info.
http://www.modelbuildersonline.com/Tuto ... 0542_hZoDg
Jim
http://www.modelbuildersonline.com/Tuto ... 0542_hZoDg
Jim
-
AJM

- Registered Seller

- Master of Masking
- Posts: 737
- Joined: May 29th, 2007, 3:11 pm
- Location: Western PA
Re: Kit Photography
Filmy's site is a great reference. You can have the lights on, but like steven said watch mixing the type of lights, using fluorescent and incandescent screw up your camera's white balance. MY photo's got a lot better once I started photographing in my work room with consistent lighting.
If looking at Filmy's site does not help, post a picture. Also post the what camera settings are you using?
If looking at Filmy's site does not help, post a picture. Also post the what camera settings are you using?
Anthony Morgan
http://www.resinbenchmodels.com
http://www.resinbenchmodels.com
-
AZ

- Registered Seller
- Squire of the Sprue
- Posts: 1330
- Joined: February 25th, 2007, 8:20 am
- Location: USA
Re: Kit Photography
Great information; thanks for posting the link.JJCap1 wrote:Filmy takes some of the best photos you'll see posted. Here's the link to his tutorial on his site. Lots of technical info.
http://www.modelbuildersonline.com/Tuto ... 0542_hZoDg
Jim
I normally photograph mine during daytime indoors with all lights off, relying on indirect sunlight only. Sometimes I have to use a tripod. Like Filmy says in his tutorial, manual camera settings often work the best for model photography.
Best regards,
AZ
AZ
-
joshuaizzo
Re: Kit Photography
Nice! That is a great site. Thanks so much for the information gang, I appreciate it.
-
MrWh1t3
Re: Kit Photography
I don't know what kind of background you're trying to get with those photos, but you can't beat a nice DIY light box.
Here are some sample pictures from the link below:


http://www.digital-photography-school.c ... light-tent
Here are some sample pictures from the link below:
http://www.digital-photography-school.c ... light-tent
-
FilmMkr

- Registered Seller
- Bishop of Build Ups
- Posts: 3130
- Joined: May 28th, 2006, 1:45 am
- Location: Houston, Texas
Re: Kit Photography
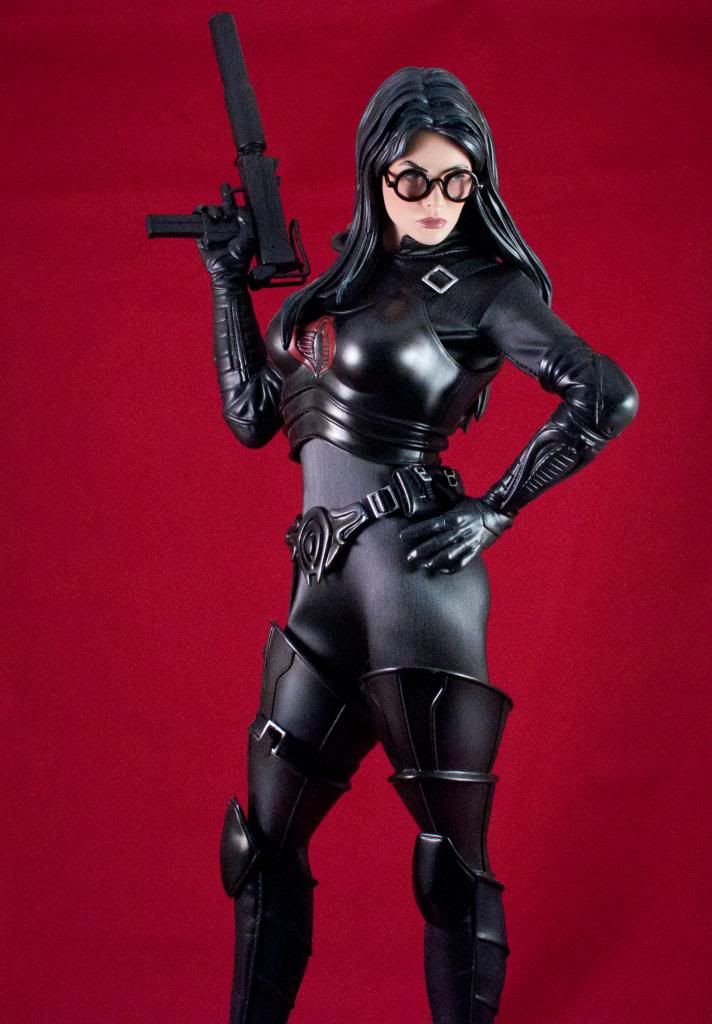
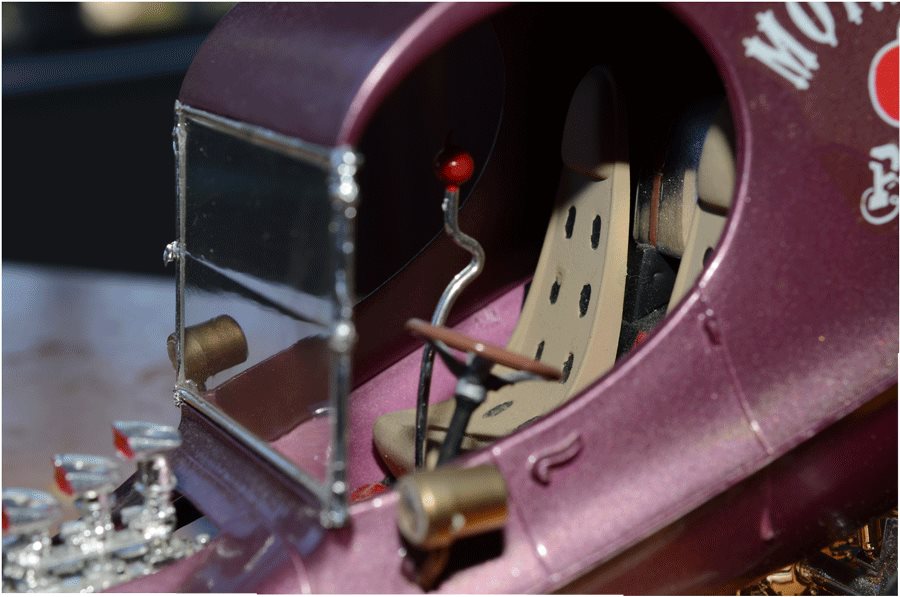
Note that neither of the subjects in the photo above is very large, nor are they very long from front to rear. They don't really demonstrate depth of field, which, if you are photographing a 1/6 scale model, is critical.
The main problem with most light tents is that you cannot pump enough light into them so that you can crank your iris down for good depth of field. If you shoot at anything below f20- f22, your model will not be in focus from front to back. If you slow your shutter to compensate, you will need a rock-solid tripod and a timed release. The only other option is to bomb the tent with high intensity light.
Most point and shoot cameras don't work very well with light tents, but with proper technique you can get adequate results.
Here are a couple of examples of deep depth of field:


(p.s. - Just for reference, I shoot everything manual so that I have total control of the image. My base exposure settings are 1/250th at f22.)
The main problem with most light tents is that you cannot pump enough light into them so that you can crank your iris down for good depth of field. If you shoot at anything below f20- f22, your model will not be in focus from front to back. If you slow your shutter to compensate, you will need a rock-solid tripod and a timed release. The only other option is to bomb the tent with high intensity light.
Most point and shoot cameras don't work very well with light tents, but with proper technique you can get adequate results.
Here are a couple of examples of deep depth of field:
(p.s. - Just for reference, I shoot everything manual so that I have total control of the image. My base exposure settings are 1/250th at f22.)
-
MrWh1t3
Re: Kit Photography
Yeah, that pretty much shoots down my light tent exampleFilmMkr wrote:Note that neither of the subjects in the photo above is very large, nor are they very long from front to rear. They don't really demonstrate depth of field, which, if you are photographing a 1/6 scale model, is critical.
The main problem with most light tents is that you cannot pump enough light into them so that you can crank your iris down for good depth of field. If you shoot at anything below f20- f22, your model will not be in focus from front to back. If you slow your shutter to compensate, you will need a rock-solid tripod and a timed release. The only other option is to bomb the tent with high intensity light.
Most point and shoot cameras don't work very well with light tents, but with proper technique you can get adequate results.
Here are a couple of examples of deep depth of field:
(p.s. - Just for reference, I shoot everything manual so that I have total control of the image. My base exposure settings are 1/250th at f22.)
-
gordman43

- Registered Seller
- Earl of Epoxy
- Posts: 1808
- Joined: March 11th, 2008, 10:06 pm
- Location: Michigan
Re: Kit Photography
Thanks for the most useful tips, good sir! Beautiful shots, as always. I can vouch for the depth of field issues.
I just had a BITCH of a time, trying to shoot my latest build. I'm an old 35mm (film) guy, but generally love digital cameras.
Not so much, now. I couldn't get the damn things (2 different digital SLR cameras) to focus sharply, to save my a$$,
whether I used auto focus or manual focus. In the end, I got some good shots, but what a drag!
BTW, I had a nice set up, with 2 photo floods and a coved backdrop, not a light tent.
- Gordon Oberman
Suite Life Productions
Amazing Figure Modeler
Inner Sanctum Productions
http://amazingmodeler.com/
Suite Life Productions
Amazing Figure Modeler
Inner Sanctum Productions
http://amazingmodeler.com/
-
FilmMkr
- Registered Seller
- Bishop of Build Ups
- Posts: 3130
- Joined: May 28th, 2006, 1:45 am
- Location: Houston, Texas
Re: Kit Photography
Not really. Its not how CLOSE you are to the subject, its how much light you pump in and how "fast" your lens is. Look on the lens that you want to use and see what the f-stop is. It should say something like f18 or f22.MrWh1t3 wrote:[Would a wide angle lens work for something like this? I have a fixed 50mm too. I think that's too large.
Here's a quick lesson in how f-stops work.
Imagine that you are inside your modeling cave on a bright, sunny summer day. Its dark in your lair because you're working on a vampire kit, so all the shades are drawn, the overheads are off, and you are working under a single desk lamp. You happen to catch your reflection in the mirror as you cross the room to the mini fridge to replace your beverage, and you see that your irises are huge. You look down at the bottle in your hand to try to read the label, but you're having trouble focusing.
Why is that?
Its because its dark in your cave and your eyes automatically compensate for the lack of light by dilating. When your irises are wide open like that, you have no depth of field.
While raiding the fridge, you remember that you left your #2 Xacto blades in the car after your run to the hobby shop this morning, so you walk outside into the brilliant sunshine, and suddenly you can't see a frigging thing because you are blinded by the glare of the sun.
After squinting and shading your eyes for a few seconds, your eyes adapt, and even though you feel like you're onstage at Radio City, you can at least see again. As you lean into the car, you check your eyes in the rearview, and whaddya know? Your irises are like pinpoints. You look down the street and you can read the street signs at the end of the block.
What happened?
Your eyes "stopped down" to compensate for the flood of light, and your depth of field improved. That's because with more light and your irises smaller, there is a much smaller, sharper, focused "circle" as the light stimulates the rods and cones (photoreceptors) on your retinas. Think of your retinas as the imaging sensor on your camera and you'll get the analogy.
The principle is the same with cameras and lenses. The smaller the aperture (iris stopped down) the greater the depth of field, and the sharper the image is on the imaging sensor (or film plane if you are still shooting film.)
So, more light = good! Smaller aperture (higher f-stop) = better! High shutter speed (no blur) + small f-stop = best!
Thank you very much, we'll be here all week. Please be sure to tip your waitresses.
p.s We cover all of this stuff in Filmy's Foto Fantastic at Wonderfest.
-
darth rodo

- Glue Sniffer
- Posts: 114
- Joined: May 5th, 2010, 6:26 pm
- Location: México
Re: Kit Photography
wow, now I get it, very good explanation!
but, in the case of very simple digital cameras, how can I apply this theory? in this can´t control the aperture of the lenses or the exposition time.
thanks for the help!
but, in the case of very simple digital cameras, how can I apply this theory? in this can´t control the aperture of the lenses or the exposition time.
thanks for the help!
-
ignatz
- Site Admin
- Knight of the Round Bench
- Posts: 12738
- Joined: November 25th, 2003, 11:31 pm
- Location: Boston
- Contact:
Re: Kit Photography
Check to see if there aren't different shooting modes. Full manual mode would be ideal, but if you can't find that, look for shutter priority or aperture priority modes. These will allow you to adjust one parameter while the camera adjusts the other to try to achieve a good average exposure (as defined by the manufacture). Then see if there's some kind of exposure compensation adjustment. This will allow you to under or over expose in set increments and will allow you to further manipulate the exposure response of the camera.
Also, in terms of extending the depth of field, if you can move the camera back from the subject and zoom in to crop, you will extend the depth of field in the shot, the trade-off in zooming in is you may start losing some apparent depth because the long focal length will compress the image front to back more. This may not be a huge issue as most point-and-shoot cameras only have zooms that go into the moderate portrait lens range, about 80-105mm equivalent in a 35mm camera. It's worth trying out as it may add a couple of extra inches of depth of field to the shot.
Also, in terms of extending the depth of field, if you can move the camera back from the subject and zoom in to crop, you will extend the depth of field in the shot, the trade-off in zooming in is you may start losing some apparent depth because the long focal length will compress the image front to back more. This may not be a huge issue as most point-and-shoot cameras only have zooms that go into the moderate portrait lens range, about 80-105mm equivalent in a 35mm camera. It's worth trying out as it may add a couple of extra inches of depth of field to the shot.
Steven
CALM DOWN. It's only a hobby.
Oh, and MODEL ON!
CALM DOWN. It's only a hobby.
Oh, and MODEL ON!
-
kitbuilder

- Registered Seller
- Squire of the Sprue
- Posts: 1062
- Joined: November 24th, 2008, 4:03 am
- Location: Melbourne, FL
Re: Kit Photography
Wow, this has all been extremely helpful for me, thanks everyone for all the wonderful details!!
Mark
Mark
Mark Warthling
aka kitbuilder
aka kitbuilder
-
darth rodo
- Glue Sniffer
- Posts: 114
- Joined: May 5th, 2010, 6:26 pm
- Location: México
Re: Kit Photography
thanks!
-
cbgorby
Re: Kit Photography
Uh . . . WOW . . . ? Where do I send the check /tip ?FilmMkr wrote:Thank you very much, we'll be here all week. Please be sure to tip your waitresses.
p.s We cover all of this stuff in Filmy's Foto Fantastic at Wonderfest.
I will now exit the room and stare at my camera in awe .
-
russelljalbanese
Re: Kit Photography
im new to photographing models. any one have any helpful hints, i want to post some models. thanks!
-
superroop73
- Brush Jockey
- Posts: 20
- Joined: April 13th, 2014, 5:28 pm
- Location: St Louis, MO
Re: Kit Photography
I have a Nikon D90 which is a pretty nice intermediate DSLR ($1100 for a kit with two lenses) and I have a f1.2 35mm lens ($175) and f2.8 200mm lens ($1200). I use my camera for more than just shooting my model kits and figures. I shoot a lot of farming photos for my In Laws and I like going to motocross and supercross races and getting nice photos there, so that's how I justified spending that kind of money for a hobby camera.  Like others have said though, most of the point and shoot cameras have other modes that give you shutter priority and aperture priority. That's what the S, ,A, P, or M modes on your camera are. I'm like Filmy, in that I only shoot in FULL Manual mode. I like to be in control of all aspects of what it is I'm shooting.
I also just bought a really inexpensive photo studio light box from amazon ($50). It's a 24" cube studio basically and perfect for shooting models (IMO). It came with two lights and a few different color backgrounds.
I turn off the other lights in the room, and usually have my f/stop around f3.2-f5. I also bump up my ISO to around 1200 or 1600. Since I use a tripod, I can slow my shutter down to around 1/20th of a second. The slower the shutter is, the more light it lets in. However, when you slow your shutter speed down that much, it is imperative that you use a tripod or you will get a blurry image as even the slightest movement will show up as blur.
These are some samples from my little studio box.


-
Otto69

- Registered Seller
- Wizard of Washes
- Posts: 6364
- Joined: January 21st, 2004, 11:53 pm
- Location: West Coast
Re: Kit Photography
I've only recently started to try filming models, with my 40mm macro lens on a Nikon 7100. Initially I had major problems with too shallow depth of field, and didn't understand how to correct it. This site, http://www.dofmaster.com/dofjs.html , really helped me figure out that to get a better depth of field I need to (as noted previously) use a higher F stop. The problem then though is any vibration at all will blur the scene. So I've tried two things:
1. I just bought a wireless remote for my camera which will allow me to shoot from a tripod with no vibrations during a longer exposure, with a better depth of field.
2. Using Adobe Photoshop I was able to take multiple short-depth of field shots with my camera on manual, then do Focus Stacking, which stacks the 4 different depth shots into one digital image.
Here's the unmerged image:
And here it is with the 4 images focus stacked and merged:
Keep America Strong, Watch More Horror Movies!
-
Heavy Metal Spike

- Knight of the Round Bench
- Posts: 13419
- Joined: August 2nd, 2005, 2:07 am
- Location: Vancouver, Canada (ex-pat UK - Birmingham & Scotland!)
Re: Kit Photography
A talent in its own right.
You all have my admiration
.
You all have my admiration
.
.
.
. . . . . . . . . . . . . . . . .
.
.
.
. . . . . . . . . . . . . . . . .
.
.