First, CAREFULLY inspect your parts - you've got 37 supremely cast parts of all sizes - spread them out and make sure everything's in order -
 IMG_2645 by Joseph Nejberger, on Flickr
After they're given a nice scrubbing, eliminate whatever mold lines are there, as well as the random air bubble (there might have been FOUR -) and then DRY FIT - ALOT -
 IMG_2629 by Joseph Nejberger, on Flickr
 IMG_2634 by Joseph Nejberger, on Flickr
A WHOLE LOT...
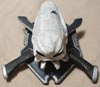
 IMG_2635 by Joseph Nejberger, on Flickr
 IMG_2636 by Joseph Nejberger, on Flickr
Before I go much further here, let me give two valuable points of reference - One, go to this original thread -
http://theclubhouse1.net/phpBB3/viewtop ... 9&t=106949
And download ALL of the reference in-progress shots Marcus has provided here - they will be INVALUABLE in figuring out where all of those lovely insectoid dreads go - Randy has also colour coded some of these parts - TAKE PICTURES OF THEM before you get big into the painting and assembly...
 IMG_2661 by Joseph Nejberger, on Flickr
 IMG_2663 by Joseph Nejberger, on Flickr
Two, make a plan of assembly. This piece has SOOOOO many opportunities to explore different painting adventures - in order to do this properly, and with the love and attention this piece deserves, much of the painting of the parts will have to be done pre - assembly. AND -
NOTHING will aid you more than a good set of these finger drills - They are available from Micro-Mark...
 IMG_2641 by Joseph Nejberger, on Flickr
Get some wire in corresponding gauges - Like I did with Larry's "Tank Girl", I am going to drill and pin, every SINGLE PIECE...
 IMG_2630 by Joseph Nejberger, on Flickr
And, I'm going to drill entry holes for EVERY SINGLE PIECE...
 IMG_2631 by Joseph Nejberger, on Flickr
And, I'm going to test fit some more. You just can't do this enough with this piece. It's very easy to make a mistake on this expensive kit -
IMG_2634 by Joseph Nejberger, on Flickr IMG_2640 by Joseph Nejberger, on Flickr
By this time, I'm ready for some refreshment. Some Bloody Caesars fill the bill nicely.
 IMG_2642 by Joseph Nejberger, on Flickr
Next, I want to make sure the area where our Gaming Goddess meets the base is seam-free. There ARE some gaps there, so I take a little impression of the area around the join with some Repli-scale, and stamp in the detail after I lay AVES around the gapping area -
That tall brass rod is for support and stability - once you get those "wings" on, this piece may become a little unstable. The rod ensures that Sarah won't be hitting the floor at any point from assembly to completion.
 IMG_2652 by Joseph Nejberger, on Flickr
 IMG_2658 by Joseph Nejberger, on Flickr
 IMG_2660 by Joseph Nejberger, on Flickr
I'm happy with the join...
 IMG_2659 by Joseph Nejberger, on Flickr
Now, I'm going to tackle that AWESOME base - I have vision for how I want to paint this, so I test fit the pinned parts (this time with brass rod), and bring my airbrush close in as if I was going to paint it to see if I can assemble and glue this before painting.
 IMG_2664 by Joseph Nejberger, on Flickr
I can. The "leaves" and base are numbered, so you won't have a problem mating them up. After epoxying the parts, I lay in some AVES to perfect the join..
 IMG_2672 by Joseph Nejberger, on Flickr
I now do a FINAL test fit of all parts to make sure this is going to go together the way I want it to before I prime -
 IMG_2643 by Joseph Nejberger, on Flickr
You can see what I mean about the space this thing takes up...
Now, before I go further, I'm going to make a personal modification and enhance her nipples with AVES and my expansive recall of female mammary anatomy.... Yeah, yeah, yeah, I'm gonna do it...
 IMG_2653 by Joseph Nejberger, on Flickr
And here she is, every part pinned, primed, and PERFECT.
 IMG_2673 by Joseph Nejberger, on Flickr
And here's where I'll leave you - TWO FULL CANS of Tamiya Primer, and she's ready for a basecoat - unfortunately, there's paying work to get done for the next few months, so it will likely be the Holidays before I can return to my new resin girlfriend.
Thanks for tunin' into this WIP - The next update will have me painting this thing, and I DEFINITELY have a vision for her - I promise it won't be as long as it will be for Season 6 of Game of Thrones to get here....Stay tuned!