
STYRENE VS VINYL VS RESIN
Quick Profiles
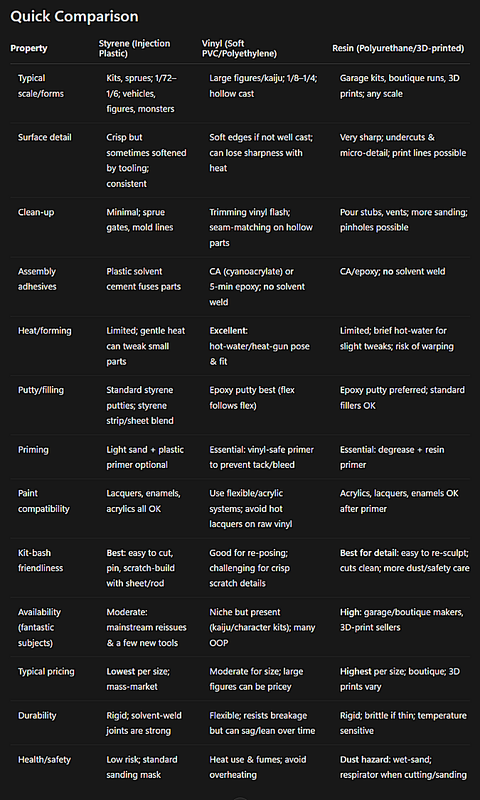
Styrene (Injection‑Molded Polystyrene)
- Strengths - Solvent‑weld assembly = clean, strong, invisible seams. - Ideal for kit‑bashing: easy to cut, engrave, and integrate with sheet/rod stock. - Paint‑agnostic after light scuff; accepts lacquers/enamels/acrylics. - Stable geometry; parts stay true on bases/dioramas.
- Watch‑outs - Some factory mold lines/sink marks; older tools can be soft. - Large organic forms (creatures) may look segmented due to part breakdown.
- Paint notes - Prime is optional; for best grip use a plastic primer or scuff with 800–1000 grit. - Hot lacquers are fine if primed; avoid puddling on thin parts.
- Best use cases - Hard‑surface subjects (ships, craft, robots) and scratch‑build heavy projects.
- Strengths - Superb for large organic figures (monsters/kaiju) with lightweight hollow casts. - Re‑posing & fit tuning via hot‑water/heat‑gun is easy. - Resistant to breakage; great for big display pieces.
- Watch‑outs - Needs a barrier/primer to avoid plasticizer bleed and long‑term tackiness. - Seams on hollow parts can be challenging to make invisible. - Detail can soften with excess heat; supports/armatures needed to prevent leaning.
- Paint notes - Always prime with a vinyl‑safe primer. Acrylic systems with flexible additives are safest. - Avoid strong reducers/hot lacquers directly on raw vinyl; use over cured primer.
- Best use cases - Large creatures, kaiju, horror characters where poseability and weight matter.
- Strengths - Highest detail: sharp textures, deep undercuts, crisp anatomy & props. - Boutique/garage kits cover niche subjects ideal for fantastic genres. - Excellent for re‑sculpting with epoxy putties; takes scribing and drilling cleanly.
- Watch‑outs - Must be degreased (mold release) before primer. - Brittle edges; mistakes chip rather than bend; pin thin parts. - Health: sanding/cutting creates fine dust—wet‑sand and wear a respirator. - 3D prints may show layer lines/support nubs; some resins are more brittle.
- Paint notes - Always prime; then any system (acrylic/enamel/lacquer) works. - For 3D prints, filler‑primers help bury micro striations.
- Best use cases - Highly detailed figures/creatures, elaborate bases, small runs, conversions.
Detailed Characteristics
Kit‑Bash & Modification Suitability
- Styrene – A+: Cuts/scribes clean; solvent welding makes invisible joins; integrates seamlessly with sheet/rod (Plastruct/Evergreen). Ideal for mechanical add‑ons, diorama architecture, and part‑swaps.
- Vinyl – B: Excellent for re‑posing via heat; structural joins rely on pins + CA/epoxy. Fine, sharp scratch‑built details are harder; use epoxy putty skins and internal armatures.
- Resin – A: Cuts/drills well; takes epoxy putty sculpting beautifully. Plan for pinning load‑bearing joins; test‑fit extensively. Wet‑sand to manage dust.
- Styrene: Steady availability via mainstream brands and periodic reissues (classic monsters/TV, some new sci‑fi). Most affordable on a size basis; aftermarket abundant.
- Vinyl: Peaks in 1990s–2000s; currently niche/collector space with intermittent new offerings (especially kaiju/character). Prices moderate to high for large pieces; many sought‑after kits are OOP.
- Resin: Dominant in garage/boutique and 3D‑print markets; constant flow of new sculpts. Prices high per volume, but unmatched subject breadth; shipping can add substantially.
- Styrene: Wash parts → light scuff → assemble with solvent cement → spot putty → prime (optional but recommended) → paint (any system).
- Vinyl: Heat‑fit and internal support → wash thoroughly → vinyl‑safe primer → acrylic/flexible paints → seal with flexible clear.
- Resin: Degrease twice → pin/test‑fit → CA/epoxy assembly → epoxy putty seam work → resin/filler primer → paint (any system) → optional satin/matte clear.
- Vinyl: Ventilate when heating; avoid scorching. Keep parts supported during cure to prevent long‑term sag.
- Resin: Wet‑sand; wear a P2/N95 (or better) respirator when sanding/cutting; vacuum and wipe down. Avoid food‑area cleanup.
- All: Eye protection when drilling/pinning; gloves for strong solvents.
Recommendations by Project Type
- Large creature/kaiju centerpiece (1/6–1/4): Vinyl for weight/pose; consider resin for sharper detail if display case protected.
- Highly detailed character/monster (1/10–1/6): Resin for fidelity; mix with 3D‑printed accessories.
- Mechanical builds, vehicles, bases/structures: Styrene for build speed, strength, and kit‑bash ease.
- Heavy conversions: Resin or Styrene depending on source kit; use epoxy putty and pins; reserve vinyl for pose changes rather than fine detail.
- Styrene → Styrene: Solvent cement (Tamiya Extra Thin, MEK), capillary application.
- Vinyl: Medium CA or 5‑min epoxy; reinforce big joins with brass rod/epoxy putty.
- Resin: Medium/gel CA + accelerator; 5–15‑min epoxy for structural; epoxy putty (Milliput/Aves) for seams and re‑sculpt.
- Vinyl paint tackiness: Use barrier/primer; allow long cure; switch to acrylics/flexible clears.
- Resin oily surfaces/paint fish‑eyes: Degrease (warm water + detergent, then isopropyl), dry thoroughly; re‑prime.
- Styrene ghost seams: Weld properly, let cure, scrape/sand, and re‑scribe before primer.
- Leaning vinyl figures: Install armatures/dowels into base; back‑fill limbs with epoxy putty/PU foam (careful with expansion).
- Styrene: Best for kit‑bashing and structural builds; cheapest; universally paint‑friendly.
- Vinyl: Best for large, organic figures and easy re‑posing; needs proper priming/armature; finish with flexible paint systems.
- Resin: Best for ultimate detail and niche subjects; requires more prep and safety discipline; widest availability in the garage/3D‑print scene.


