Romulan Bird-of-Prey from TOS

Show off your in-progress builds! This is the place to post questions about building and painting your model kits and to share your latest techniques.

Moderators: tay666, Moderators

Message
Author
User avatar
Trekkriffic
Master of Masking
Posts: 949
Joined: April 18th, 2014, 10:15 pm

Re: Romulan Bird-of-Prey from TOS

#21 Post by Trekkriffic »

starmanmm wrote:Trekkriffic, I replaced the bedknobs with clear domes for the flashing leds which also bled back towards the tail which I had replaced with plastic tubing; I had also tried to flip the bottom to create the reversed clam shell to the stern... but I didn't like how it came out. Used FO and bright white leds. If I were to try it again, I would have used aves to hold the wings to the body. The auto body spot putty worked to hide the seams but over time it has cracked.
Getting those wings to the right angle and strong enough not to crack the putty was a major job on that big kit.
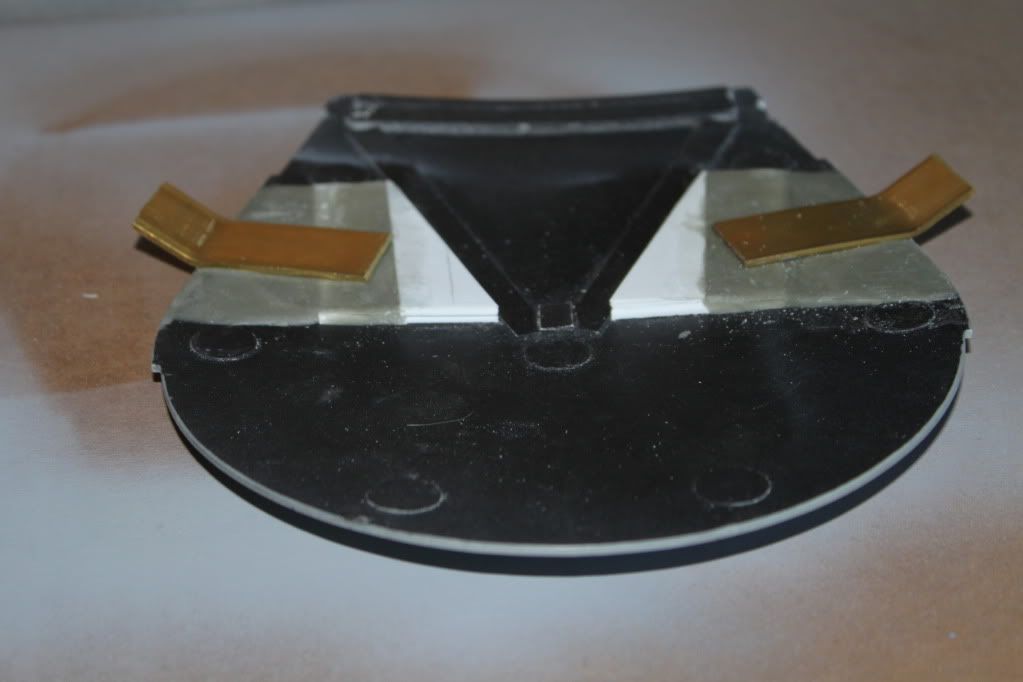
On my build, to add strength and rigidity to the wings and get them to stay at the proper angle, I mounted two brass plates to the lower body:

Image
Image

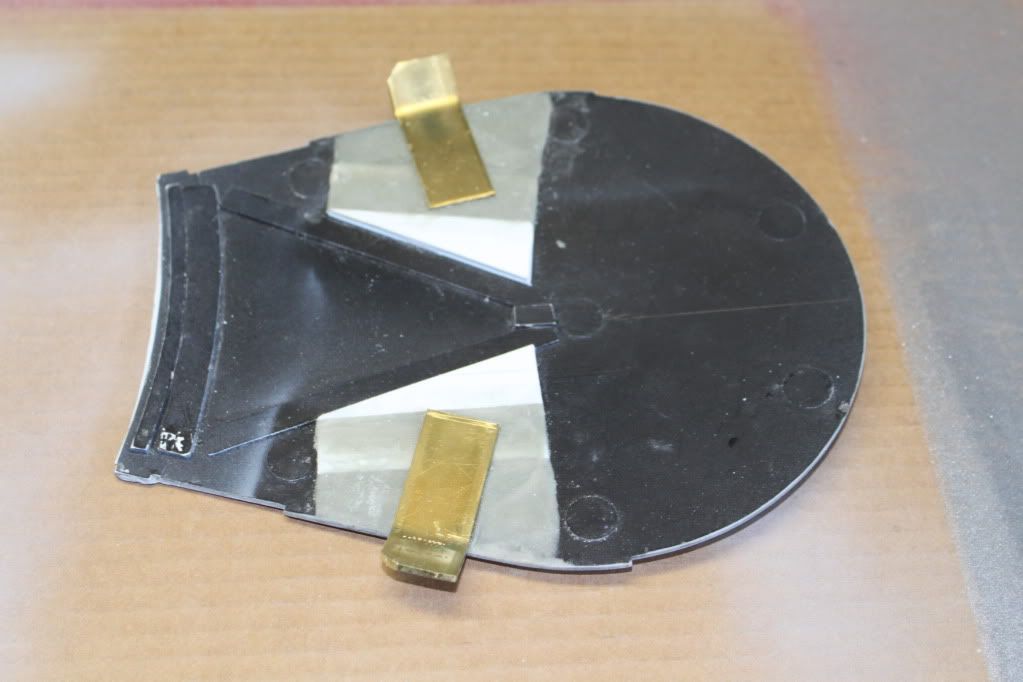
Later the wings popped off the AVES I'd laid down to make a flat surface to attach them to so I ended up gluing them to the, by now, hardened putty with 5-minute epoxy. That seems to have done the trick as I have had no issues with sagging or cracking since then. Of course, I glued the wings to the brass brackets with more 5-minute epoxy then I used more AVES to putty the external seams which added even more strength to the joints.

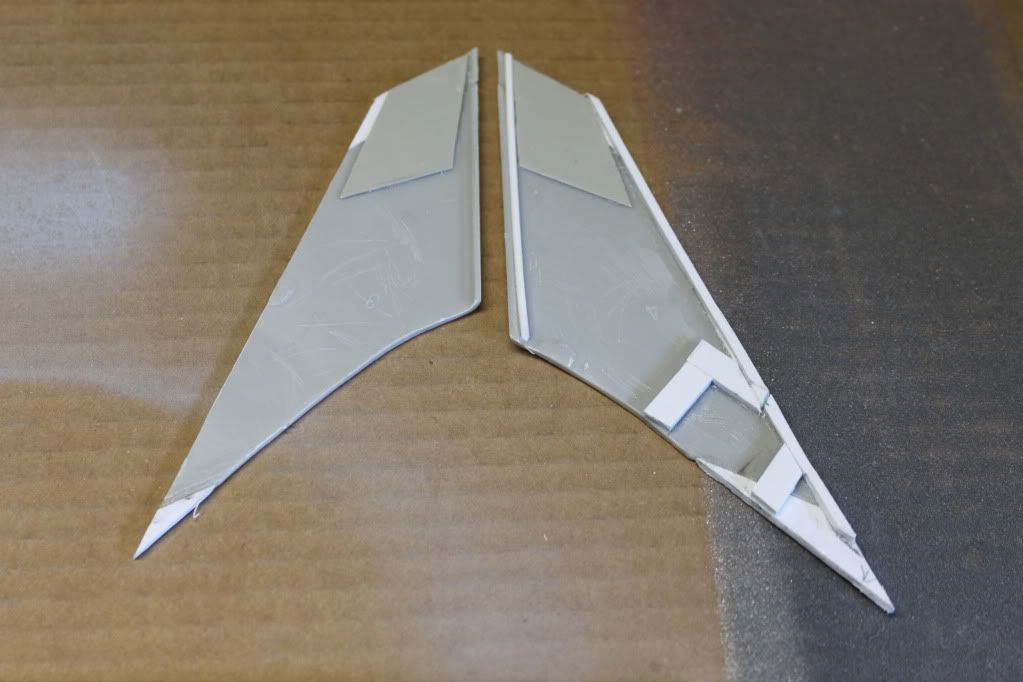
You can see how I extended the wings in this pic of an upper and lower wing half. Also note the framework I built for the brass bracket to slide into near the back of the lower wing half:

Image

If your interested you can view the rest of the build pics here in my old Photobucket album:
http://s146.photobucket.com/user/Trekri ... t=3&page=1
User avatar
the Baron
Finger Painter
Posts: 86
Joined: August 30th, 2012, 4:22 pm
Location: Bethlehem PA, USA

Re: Romulan Bird-of-Prey from TOS

#22 Post by the Baron »

Beautiful job of detailing that kit! Your hard work paid off. The finish pattern for the hull plates is very cool, that came out nicely.
"The bigger the government, the smaller the citizen."
User avatar
Trekkriffic
Master of Masking
Posts: 949
Joined: April 18th, 2014, 10:15 pm

Re: Romulan Bird-of-Prey from TOS

#23 Post by Trekkriffic »

the Baron wrote:Beautiful job of detailing that kit! Your hard work paid off. The finish pattern for the hull plates is very cool, that came out nicely.
Thank you! I assume you are referring to my current build. Yes, the hull aztecing is coming along pretty well. The more I get into it the easier it gets to create a balance even with an assymetirc pattern like this. One may consider brushpainting like this to be the poetic stage of model building with the nuts and bolts of assembly being the prose.
User avatar
Splash-Art
Seam Filler
Posts: 319
Joined: October 24th, 2012, 4:57 pm
Location: Scottsdale, AZ
Contact:

Re: Romulan Bird-of-Prey from TOS

#24 Post by Splash-Art »

Okay, I just finished reading and viewing all WIP pics within this post, and it's AMAZING! Your "eye" for detail, and the ability to make it happen is beyond words. Great skills! Thanks for sharing all your details =)
User avatar
Trekkriffic
Master of Masking
Posts: 949
Joined: April 18th, 2014, 10:15 pm

Re: Romulan Bird-of-Prey from TOS

#25 Post by Trekkriffic »

Splash-Art wrote:Okay, I just finished reading and viewing all WIP pics within this post, and it's AMAZING! Your "eye" for detail, and the ability to make it happen is beyond words. Great skills! Thanks for sharing all your details =)
Thanks a lot Splash-Art! :D


Here are a few more pics of current progress with the "aztec" paneling.

Masking tape template in use. I probably have about 8 or 10 different patterns I use:

ImageMasking Tape Template by trekriffic, on Flickr

Here I finished all the lower surfaces with the second layer of steel/gunmetal panels:

Image2 Color Aztec Done by trekriffic, on Flickr

And here's the lower hull after the third layer of gold panels:

Image3 Colors Done-Underside of Hull by trekriffic, on Flickr

And the upper hull after gold panels:

Image3 Colro Aztec Done-Upper Hull by trekriffic, on Flickr

I still need to finish the gold panels on the nacelles and the sides of the ship. Also the fin has no paneling done yet so there's that to do too.

When I'm done the paneling will be much more subtle than it appears right now. The paneling serves mostly as underpainting to break up the surface and make the hull more interesting.

Thanks for your patience folks!
User avatar
Trekkriffic
Master of Masking
Posts: 949
Joined: April 18th, 2014, 10:15 pm

Re: Romulan Bird-of-Prey from TOS

#26 Post by Trekkriffic »

All done with the gold paneling now.

Here's the dorsal fin:

ImageAztec Paneling on Fin by trekriffic, on Flickr

Also the bow rim:

ImageAztec Paneling Bow by trekriffic, on Flickr

The stern and sides are done as well. Mulling over the idea of overlaying the metallic panels with two shades of grey aztecing thinned with ModelMaster clear enamel so the metallic panels show thru. This aztecing would be larger panels alternating darker with lighter grey panels like those seen on the Enterprise D. This would be brushed on and lightly sanded before doing the final overspray with the airbrush.

Anyway, while the paint dried I decided to do something I'd been thinking about for the bussards, something I'd seen in a SOTL calendar image showing a BOP flying low over the Romulan Capitol. I added some spokes to the rim of the domes. This further cements the notion this ship is influenced by Federation tech. Here's a test shot with the blue LED lighting one of the domes on the front of the nacelle:

ImageBussard Spokes by trekriffic, on Flickr

Before I could get started on the other dome; however, I noticed this:

ImageCracked Bussard Dome by trekriffic, on Flickr

Crap! A large crack halfway across the dome!? As the part is still on the sprue I'm calling this a factory defect. The only thing I did with the part was to brush some Floquil flat base on the inside of the dome for diffusion purposes. No other stress was placed on the part that would have caused it to crack. So I'll be mailing in my UPC/Date code off the box with the parts replacement request form to Round 2. Hopefully they can ship out a new dome to me within the next few weeks.
In the meantime, I'll continue working on the paint job.
User avatar
Trekkriffic
Master of Masking
Posts: 949
Joined: April 18th, 2014, 10:15 pm

Re: Romulan Bird-of-Prey from TOS

#27 Post by Trekkriffic »

After mailing my replacement parts request form off to Round 2 this morning for a new bussard dome I came home from work during lunch and gave her an overcoat to mute the aztec. I found a 50/50 mix of ModelMaster Clear and HellBlau was about right to brush on over the aztecing. For areas where I obscured too much aztecing I dipped the brush in airbrush thinner, dobbed it on a rag to remove most of the thinner, and dragged it over the surface to thin the Hellblau mix and expose more of the paneling. Once this first coat fully cures in 2-3 days I'll go over it lightly with sanding films to bring back even more of the aztecing before the final very thin airbrush coats. Still deciding on the colors I want to use for the final coats; one thing I know is it will be a darker shade of grey on top than on the bottom. And the area behind the feathers on the stern and trailing edges of the wings underneath wil be even lighter, a mix of insignia white with the grey color of the underside.

Here is the ship as she appears right now in direct sunlight:

Image' by trekriffic, on Flickr

ImageOvercoating with Hellblau by trekriffic, on Flickr
User avatar
Trekkriffic
Master of Masking
Posts: 949
Joined: April 18th, 2014, 10:15 pm

Re: Romulan Bird-of-Prey from TOS

#28 Post by Trekkriffic »

These complex paintjobs take some time and effort but I think it's worth it to create that unique look I want with my builds.

Anyway, did some more work on it this morning...

Sanding film was used to thin the brushed overcoat after allowing 2 days for the paint to cure. This revealed more of the underlying paneling. As mentioned earlier, this is all in preparation for the final airbrush coats so the aztecing doesn't completely vanish in the process:

ImageLight Sanding of the Brushed Coat by trekriffic, on Flickr


Standing on my driveway for these shots. It's a nice sunny day here in Fremont, CA...
Here's the underside after sanding:

ImageBottom After Light Sanding by trekriffic, on Flickr

There was a patch near the bow where, while brushing with the 50/50 Hellblau/clear mix, I got a little carried away trying to smooth out brushstrokes and removed some of the underlying aztec paneling. Doh! So, after allowing a day for the overcoat to dry, I went back in and restored the aztecing with a fine brush. After another day or so for the new aztecing to cure I'll reapply my Hellbalu mix to cover it up and blend it in with the rest of the paint.

Here's the top surface:

ImageTop After Light Sanding by trekriffic, on Flickr

Same issue with the one patch near the bow as regards restoration of the aztecing. She'll get her touchup with the brush and then a final sanding before final airbrush coats.

All the handbrushing with the Hellblau/clear mix had left a mildly rough texture behind but that's no longer the case. She's nice and smooth now.

Anyway, thanks for reading along!
User avatar
Trekkriffic
Master of Masking
Posts: 949
Joined: April 18th, 2014, 10:15 pm

Re: Romulan Bird-of-Prey from TOS

#29 Post by Trekkriffic »

Short update...
So today I set about stretching some clear plastic packaging to make the inner domes for the bussard "spokes" to be applied to...

The thin plastic was heated with a heat gun then quickly stretched over the round end of a paintbrush handle to make the domes that will fit inside the kit provided bussard domes:

ImageStretching Clear Plastic to Make Inner Bussard Domes by trekriffic, on Flickr

ImageClear Plastic Dome by trekriffic, on Flickr

After cooling, the dome was cut from the plastic tray. Eight thin pointed strips of adhesive backed aluminum mylar were then laid around the perimeter spaced evenly to create the spokes.
After that the dome was slid inside the kit dome which had been brushed with Floquil Flat Base the night before. This gave the bussard a nice even glow. The spokes really turned out nice I think:

ImageBussard Dome Lit with Inner Dome in Place by trekriffic, on Flickr

ImageBussard Domes Finished and Lit Up by trekriffic, on Flickr

After this light test the domes were removed and placed in a ziplock bag to protect them until I'm ready to glue them to the front of the nacelles near the end of the build.

Moving along I took a photocopy of the decal sheet and cut out the lower raptor decal. The double-side scotch tape was applied to the underside along the rear feathers:

ImageBird Masking Template by trekriffic, on Flickr

The raptor mask, now sticky with tape on the back, was positioned on the lower hull. Once I am sure the edges are well sealed I'll mix up a batch of the lower hull color, add a little white to it, and airbrush the aft underside of the ship and wings to give it some contrast with the area of the lower hull and wings forward of the raptor decal:

ImageBird Mask Appled to Lower Hull by trekriffic, on Flickr

These are the colors I'll be thinning and airbrushing for the final hull coats:

ImageHull Colors by trekriffic, on Flickr

ImagePaints for Final Hull Coats by trekriffic, on Flickr

Mix ratios will vary. My goal is for the upper hull to appear darker in value than the lower hull with the lower stern of the ship even lighter than the front.
User avatar
Trekkriffic
Master of Masking
Posts: 949
Joined: April 18th, 2014, 10:15 pm

Re: Romulan Bird-of-Prey from TOS

#30 Post by Trekkriffic »

Today I airbrushed the underside...

The area aft of the feathers was airbrushed after masking with a 50/50 mix of Light Sea Gray and Dark Ghost Grey. To this mix was added an equal amount of Testors Flat White. Model Master Gloss Clear was then added for more transparency. This was then thinned with airbrush thinner to the consistency of milk before spraying:

ImageUnderside of Stern Airbrushed by trekriffic, on Flickr

After allowing a half hour to dry the raptor mask was carefully peeled off the underside. Some of the Hellblau paint layer stuck to the tape but that was of no concern since it would eventually be covered by the raptor decal:

ImageMasking Template Removal by trekriffic, on Flickr

Here's the aft area after mask removal. The painted area appears more white in this photo than it actually is. Basically it's a very light neutral gray color.

ImageAft Underside After Mask Removal by trekriffic, on Flickr

After reapplying the mask the area forward of the raptor was airbrushed with the 50/50 Light Sea Gray and Dark Ghost Gray mix to which an equal amount of Model Master gloss clear enamel was added. No white was added this time though since I wanted it to be darker than the stern:

ImageForward Area Airbrushed on Underside by trekriffic, on Flickr

You'll notice I didn't airbrush the area that will be under the raptor decal; I wanted to leave the aztecing more pronounced there in the hopes some of it might show after applying the decal.

Soooooooo.... I'll let this dry overnite before airbrushing the top tomorrow.
Then I might go back with sanding films to smooth the finish and reveal a little more of the aztecing before sealing with Glosscote.
Once that's dry I'll poke out the windows and sensor ports that got clogged with paint so I can install fiber strands for lighting.
Then it wil be time for decaling this bird.
User avatar
Trekkriffic
Master of Masking
Posts: 949
Joined: April 18th, 2014, 10:15 pm

Re: Romulan Bird-of-Prey from TOS

#31 Post by Trekkriffic »

So, over the weekend, I tried lightly sanding the top layer of paint fore and aft on the underside but it looked like crap; I really didn't like how the final paint coats was covering over all of my aztecing so... I tried wiping it off with thinner to start over but, as I was afraid of, it took off the underlying aztecing too so... I ended up repainting the aztec over the entire underside of the ship using what was still visible underneath as a guide when possible. Only took about 3 hours to do. Now I will apply an even thinner layer of the Hellblau mix to match the hull color currently on top. Then I'll try some thinner layers of the final two colors underneath once the Hellbalu dries. That should allow more of the aztecing to show thru. Ooooophda! This little ship is killing my neck and shoulders!
User avatar
Trekkriffic
Master of Masking
Posts: 949
Joined: April 18th, 2014, 10:15 pm

Re: Romulan Bird-of-Prey from TOS

#32 Post by Trekkriffic »

Well after the light coat of Hellblau mixed with Flat Base was good and dry I airbrushed more of my final colors fore and aft. The only difference this time was adding Flat Base and just a little Hellblau to the mix before thinning with airbrush thinner. I am much more pleased with the results the second time around:

ImageStern Underside Redone by trekriffic, on Flickr

ImageBow Underside Redone by trekriffic, on Flickr

ImageSecond Try by trekriffic, on Flickr

The aztecing is subtle still but clearly visible from less than 4 feet away. Beyond that and the main impression is of a grey hull which is what I was shooting for.
User avatar
Trekkriffic
Master of Masking
Posts: 949
Joined: April 18th, 2014, 10:15 pm

Re: Romulan Bird-of-Prey from TOS

#33 Post by Trekkriffic »

I mixed the following enamels for the upper hull and nacelles:
40% Gunship Grey
30% Light Ghost Grey
20% Hellblau
10% Flat White

After mixing in about the same amount of Flat Base I set to work with the airbrush:

ImageStern Upper Hull by trekriffic, on Flickr

ImageBow Upper Hull by trekriffic, on Flickr

The effect is very subtle, the paneling is only visible from about 3 feet away. Once the paint is fully cured I'll give her a light going over with polishing film before applying the Glosscote.
User avatar
Trekkriffic
Master of Masking
Posts: 949
Joined: April 18th, 2014, 10:15 pm

Re: Romulan Bird-of-Prey from TOS

#34 Post by Trekkriffic »

Here's some eye candy with the lights on after I finished installing all the fibers:

ImageLight Test after Fiber Installation by trekriffic, on Flickr

ImageBow Lights by trekriffic, on Flickr

ImageLight Test Complete by trekriffic, on Flickr

I'll give the enamel paint another day to cure before I hit her with a few coats of Glosscote before applying the decals.
User avatar
kevtk135
Registered Seller
Registered Seller
Posts: 6216
Joined: December 20th, 2003, 2:15 am
Location: SI, NY
Contact:

Re: Romulan Bird-of-Prey from TOS

#35 Post by kevtk135 »

Holy Moley :jam:
Thats an awesome build!! :shock:
Kev
~~~

I used to never finish anyth

My little corner of the Net: http://www.kevtk.blogspot.com
User avatar
Trekkriffic
Master of Masking
Posts: 949
Joined: April 18th, 2014, 10:15 pm

Re: Romulan Bird-of-Prey from TOS

#36 Post by Trekkriffic »

kevtk135 wrote:Holy Moley :jam:
Thats an awesome build!! :shock:
Thanks a lot!

You guys are going to think I'm nuts but I still wasn't quite happy with the aztecing so... I went ahead and did a third round of handbrushed aztecing this time using copper instead of gold for some of the panles. I also used two shades of light and dark grey along with metallic silver. Afterward I airbrushed a new mix of Neutral Grey, Navy Blue, Gunship Grey, and Ghost Grey. Mixed that with some Floquil Flat Base and thinned to taste. Afterward I was finally satisfied. The silver panels really show up nicely when you tilt the hull at various angles to the light:

ImageHull After Third Round of Aztecing by trekriffic, on Flickr

ImageHull with Silver Panels Visible thru Overcoat of Grey by trekriffic, on Flickr

After drying overnight I started in on the fiberoptic installation...

ImageFiber Optic Strand by trekriffic, on Flickr

With the fiber still on the spool I carefully heated the end of the strand using a BIC lighter. The fiber bloomed into a tiny bulb:

ImageBlooming the Ends by trekriffic, on Flickr

The strand was cut to length and dipped in clear parts cement:

ImageClear Parts Cement by trekriffic, on Flickr

Using tweezers I placed the fiber strand into the hole I'd drilled out for each window and sensor port:

ImagePlacing Strand in Sensor Ports by trekriffic, on Flickr

The flat end of a microbrush was handy for pushing the fiber optic bulb on the end of the strand into the hole. The fiber was a little undersized for the hole but the bulb was just the right size for pressing into the opening so the fiber was flush to the frame:

ImagePushing the Strand Flush with a Microbrush Handle by trekriffic, on Flickr

Any glue residue was cleaned up with a moistened brush:

ImageCleanup by trekriffic, on Flickr

Here's some eye candy with the lights on after I finished installing all the fibers:

ImageLight Test after Fiber Installation by trekriffic, on Flickr

ImageBow Lights by trekriffic, on Flickr

ImageLight Test Complete by trekriffic, on Flickr

I'll give the enamel paint another day to cure before I hit her with a few coats of Glosscote before applying the decals.
User avatar
Trekkriffic
Master of Masking
Posts: 949
Joined: April 18th, 2014, 10:15 pm

Re: Romulan Bird-of-Prey from TOS

#37 Post by Trekkriffic »

Yesterday was decal day! WOOHOOOO!

Got all my tools and decal setting solutions out and organized:

ImageDecaling Tools by trekriffic, on Flickr

ImageDecal Setting Solutions by trekriffic, on Flickr

Did the upper hull and wing decals first. One decal on the tail fin broke in two as did one of the scalloped decals on one of the wings but I was able to match the edges up precisely so you can't even see where the breaks occurred:

ImageUpper Hull and Wing Decals by trekriffic, on Flickr

The big BOP decal that always makes me nervous was successfully applied. Having it printed in three sections really was a stroke of genius on the part of Round 2. It makes it a lot easier to apply the decal without wrinkling and tearing it; it also makes it much easier to squeeze out any trapped water. I took the advice from the instructions and cut the nacelle parts of the wing decal loose too to apply them last:

ImageLower Hull Bord-of-Prey Decal by trekriffic, on Flickr

One problem with the thin decal material was fragility. There were some places where the edges of the decal fragmented. Such as this area here:

ImageDecal Fragmentation by trekriffic, on Flickr

I resolved to repair the boo-boos using a sheet of old military aircraft decals I keep in my stash for things such as this:

ImageUsing Spare Decals for Repairs by trekriffic, on Flickr

ImagePiece of Black Decal Material by trekriffic, on Flickr

ImageApplying Spare Decal Material to the Model by trekriffic, on Flickr

The repaired decal:

ImageCompleted Reapair by trekriffic, on Flickr

This big feather was missing its tip:

ImageFeather Missing it's Tip by trekriffic, on Flickr

A new tip was overlayed and covered iwth a coat of liquid decal film. All the repairs were brushed with Micro SOL followed by a brushing of liquid decal film:

ImageRepairing the Feather Tip by trekriffic, on Flickr

The reapaired tip:

ImageReapaired Feather Tip by trekriffic, on Flickr

Another featehr was missing achunk from the side of it:

ImageAnother Feather to Repair by trekriffic, on Flickr

A short piece of spare black decal was laid on. looks good enough for government work eh?

ImageFeather After Repair by trekriffic, on Flickr

Here's a famous angle of the BoP from Balance of Terror to wet your appetites:

ImageFamous Angle from Balance of Terror by trekriffic, on Flickr


Oh one other thing I did was add this mounting point to the port aft end of the ship:

ImagePort Mounting Hole by trekriffic, on Flickr

That's all for now. I'll let the decals dry overnight and seal them tomorrow with more gloss clear. Then she'll get a coat of matte flat before I go in with some pastel chalks.

Stay tuned my fellow centurions!
User avatar
kevtk135
Registered Seller
Registered Seller
Posts: 6216
Joined: December 20th, 2003, 2:15 am
Location: SI, NY
Contact:

Re: Romulan Bird-of-Prey from TOS

#38 Post by kevtk135 »

Excellent job with the decals! I've learned the hard way that I need to cut big decals into pieces to keep from ruining them. ;)
Kev
~~~

I used to never finish anyth

My little corner of the Net: http://www.kevtk.blogspot.com
User avatar
Trekkriffic
Master of Masking
Posts: 949
Joined: April 18th, 2014, 10:15 pm

Re: Romulan Bird-of-Prey from TOS

#39 Post by Trekkriffic »

kevtk135 wrote:Excellent job with the decals! I've learned the hard way that I need to cut big decals into pieces to keep from ruining them. ;)
Yes. And even then they can fragment.
User avatar
Trekkriffic
Master of Masking
Posts: 949
Joined: April 18th, 2014, 10:15 pm

Re: Romulan Bird-of-Prey from TOS

#40 Post by Trekkriffic »

Small udpate...

After applying Tamiya pastel chalks for some minor weathering I sealed with Dullcote. Still need to attach the bussard domes and unmask the rear of the nacelles. I also made an arm with a power plug at the tip for use during photography sessions.

Just a little exhaust soot on the wings from firing her atomic missiles:

ImageWeathering on Wing by trekriffic, on Flickr

Same for the plasma torpedo emitter on the bow:

ImagePlasma Torpedo Emitter Scoring Under Bow by trekriffic, on Flickr

ImageWeathering on Bow by trekriffic, on Flickr

Arm for photography which I need to cover with black velvet for shooting against my black velvet backdrop for "space" shots:

ImagePhotography Arm by trekriffic, on Flickr

The long arm plugged into the back of the BOP:

ImageBOP on Photography Arm by trekriffic, on Flickr

You may note in these photos an unfortunate casualty of applying two coats of gloss for decaling and a few more coats of matte for weathering and sealing was the loss of the reflectivity of the paneling under the final grey layer which I really liked. I don't know if using a frisket with rectangles cut out to use in brushing on some Future would look as good or not. The nice thing about the subtle silver panels under the overlying grey color was just that, it was underneath not on top which would be the case if I added some paneling back using Future. Also the Future would not be nearly as subtle. I'll have to think about that; the paneling is still discernible however muted it may be.
Post Reply