Here is my build/Diorama of a 9.6" Gemini 12 from the original Lost in Space Pilot.
A little background info...
Around approximately 6 years ago now(really?!), as an actual fan of the original series, loving the original design of the Robinson's spaceship and Using some detective skills, I tracked down the owner of the prop with the hopes of restoring it to it's original condition.
Andre Dhont sent me current(then) images of his acquisition in its storage area. The miniature would need a lot of work.
After contacting friends and other model makers on how I would restore the ship, I decided it would be a major challenge just getting the model delivered to me as Andre lived on the West Coast and I am on the East Coast. Visions of it arriving on my driveway in pieces helped in deciding what I should do.
At that time, I was trying to figure out who might be able to do the job.
At that time I introduced Andre to Paul Lubliner. After some negotiations, Lubliner picked up the Miniature and did the restoration. After he restored the miniature, he took it to get 3d scanned .
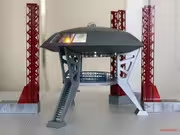
After some time, he sent me the parts of a 9.6" Gemini 12 made from scans of the actual filming miniature. NOT assembled or painted.(see attached photos).
This consisted of the upper and lower hull, clear parts for the windows, the upper bubble, the scanner in the upper bubble, Interior parts of the the three computers in the window, left and right bulkhead assemblies ETC...
UNASSEMBLED and UNPAINTED. UNASSEMBLED and UNPAINTED.
After, he sent me a fully assembled/ painted fusion core. The clear vacumform insert, the fins ETC...Also brackets and motor for the lighting.
HOWEVER, after receiving I immediately began developing my own light system and LEDS as I didn't care for his supplied parts. I also removed his vacuum formed clear insert for the windows And devised my own motor, rotating effect based on the same ideas I had already done on my 18" Moebius Jupiter 2 years before. I also added a potentiometer(just like I did on my 18" Hero build of the Jupiter 2), so I could have the lights spin at any speed I wish.
During one of my SPFX Videos I made of the model ( see my YOUTUBE channel), the ship was damaged and I had to restore the fins on the core and repair the model. This necessitated in a repaint and another rebuild of the model. AND the Core. The fins were damaged and removed. The whole assembly required sanding and priming to get the finish correct. The entire model was then air brushed Tamiya Flat aluminum.
The "plastic"the model was made from required multiple sanding and light coats of paint for the finish to stick...a nightmare.
SO...the model seen here was in the end totally built, Painted and lit by me just as if one were to purchase an unassembled plastic model kit and did the BUILD.
That is until a day or so ago when I tested the model against the exterior wall of my home.
It's now in pieces and ready to go out with the trash.
I am good with that.
The Launch tower and three support towers were beautifully rendered in 3d design by Bobovich Designs and printed for me by Anthony Sforza. Two great guys! They are safe and in storage.
I airbrushed them and assembled them. I scratch built the tank treads and corrected the "feet" of the pad. I used brass tubing cut to scale for the hand rails.
note:
UPDATE...
I decided not to trash the model as I intended. It's currently salvageable and I plan on fixing it.
I also plan on making a "lift off sequence with the models.
Thanks!
https://www.youtube.com/watch?v=Kbj8d8REOt4